MiniMax H3 Image Is Here: 16 MP Images and Edits in 6 Steps, Running Locally in ComfyUI
MiniMax H3 Image is a new 33.1B model that generates and edits 16 MP pictures in 6 steps on your own GPU; our ComfyUI V150 ships two ready presets for it.
Published Nov 11, 2026 · 6,363 views · Watch on YouTube
Get the app and files
MiniMax H3 Image in ComfyUI: 16 MP Images and Edits in 6 Steps
MiniMax H3 Image is a new 33.1B model that generates and edits 16 MP pictures in 6 steps on your own GPU; our ComfyUI V150 ships two ready presets for it.
Chapters
- 0:00 A rusted wreck restored at 16 megapixels
- 1:21 Where the two new MiniMax presets live
- 1:37 Text to image: a 16 MP picture from words
- 2:22 The prompt enhancer: MiniMax's own, running locally
- 3:22 The exact prompt the model received
- 3:49 Fast enhancer mode: a 16 MP image in real time
- 4:37 Image edit: restore a photo with one sentence
- 5:34 The restored car and why it moved into a showroom
- 6:11 Many references, lettering, sizes, speed and lower VRAM
- 6:42 1 vs 4 vs 16 MP: 16 MP recommended
- 6:58 RTX 5090 speed, and with a 12 GB limit
- 7:27 Get the V150 zip and the model bundle
- 7:59 The MiniMax-H3 model bundle in the Model Downloader
About this video
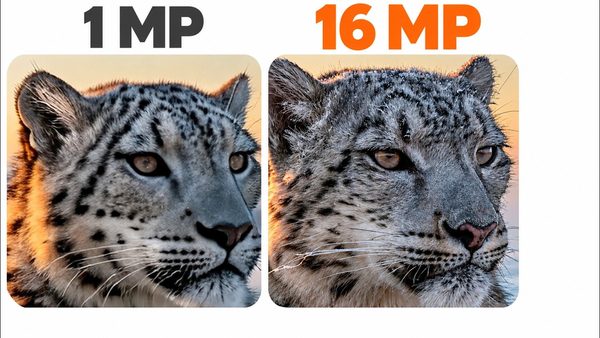
MiniMax H3 Image is a new 33.1B image model that generates and edits pictures at 16 megapixels, 4096 × 4096 or a matching wide or tall size, in only 6 sampling steps on your own NVIDIA GPU, with no upscaler. Our SECourses ComfyUI installer V150 ships two ready presets for it, Text To Image 16 MP and Image Edit Up To 16 Images, with every model and setting already chosen. MiniMax's official prompt enhancer runs locally inside them in three modes (reasoning, fast and off): it turns a short idea in any language into the detailed caption the model was trained on, picks the aspect ratio, and a box shows the exact prompt the model received. The SECourses Model Downloader V190 fetches every model file into the right folders from one bundle. In this mini tutorial a rusted, moss-covered Volkswagen Beetle is restored with one plain sentence, 9 typed words become a 16 MP photo of a fox, and you see a room furnished from 4 photos, letter-perfect posters and 1 MP vs 4 MP vs 16 MP.
Links:
Download the ComfyUI installer zip V150 with both MiniMax H3 Image presets (our ComfyUI post): [ https://www.patreon.com/posts/105023709 ]
SECourses Model Downloader V190 with the MiniMax-H3 Core and Low VRAM bundles (our SwarmUI post): [ https://www.patreon.com/posts/114517862 ]
Full ComfyUI installation tutorial: [ https://youtu.be/nxsCBTcCVp4 ]
How to update ComfyUI (mini tutorial): [ https://www.youtube.com/watch?v=sdD3--WbHZk ]
ComfyUI mini tutorials playlist: [ https://www.youtube.com/playlist?list=PLABQ076bsdXU ]
SECourses Discord: [ https://discord.com/invite/software-engineering-courses-secourses-772774097734074388 ]
You will learn how to open the MiniMax H3 Image text to image preset from the Presets folder with Ctrl+O, write a short idea in box 1 in any language, keep the recommended 16 MP output size, use the prompt enhancer in reasoning mode for the best captions or fast mode for quick tries, switch it off when you write a long caption yourself, read the exact prompt the model received, and inspect the result at full size. In the image edit preset you add your photo to the gallery as @image1, write the change as one plain sentence with no mask, say what must stay the same (the forest, the light, the camera angle), and name more reference images with @image2 and @image3. Finally you set up the route yourself: download the ComfyUI V150 zip from our Patreon post, extract it over your ComfyUI folder, run the update file, install bundle 100 with the bundles installer, then open the MiniMax-H3 Core Bundle in the Model Downloader (4 files for images, about 44 GB) or the Low VRAM Bundle, which brings a smaller version of the image model.
Main topics include MiniMax H3 Image, ComfyUI presets, text to image, AI photo restoration, multi-image editing with @image tags, the local prompt enhancer, automatic aspect ratio, 6-step sampling, native 16 MP without an upscaler, RTX 5090 speed and lower VRAM use.
Use the chapters to jump to the first image, the photo edit, the comparisons, the speed numbers or the downloads.
Chapters:
0:00 A rusted wreck restored at 16 megapixels
1:21 Where the two new MiniMax presets live
1:37 Text to image: a 16 MP picture from words
2:22 The prompt enhancer: MiniMax's own, running locally
3:22 The exact prompt the model received
3:49 Fast enhancer mode: a 16 MP image in real time
4:37 Image edit: restore a photo with one sentence
5:34 The restored car and why it moved into a showroom
6:11 Many references, lettering, sizes, speed and lower VRAM
6:42 1 vs 4 vs 16 MP: 16 MP recommended
6:58 RTX 5090 speed, and with a 12 GB limit
7:27 Get the V150 zip and the model bundle
7:59 The MiniMax-H3 model bundle in the Model Downloader
Measured numbers and their conditions: on an RTX 5090 with the models loaded, 6 steps, prompt encoding and decoding included and the prompt enhancer not included, 1 MP took 3.4 s, 4 MP 5.7 s and 16 MP 15.7 s. With ComfyUI limited to 12 GB of the same card's memory, a 16 MP image still finished in 19.5 s, the rest streaming from system RAM; a real 12 GB card computes slower. On camera, the fast enhancer mode made a second 16 MP fox in under half a minute from the click, and reasoning mode adds about a minute for the best captions.
This video is for ComfyUI users and AI image makers with an NVIDIA GPU who want the newest local image model at its full 16 megapixel quality without collecting files, nodes and settings by hand: open a preset, write one sentence and click Run. If ComfyUI is new for you, start with the installation tutorial linked above; if it is already installed, the update tutorial shows the zip update step by step.
For support, questions, feature requests or installation issues, see the pinned comment, our Patreon posts, our Discord and the video comments. Thank you for watching.